Saturday, December 3, 2016

Patriotic Quilt of Valor


This is my donation quilt for Quilts of Valor. Quilts of Valor provides quilts to veterans of United States military service. This is the website if you're interested in donating a quilt. http://www.qovf.org/

I also made this quilt in order to compete in a Patriotic Quilt Challenge in the guild that I am a member of. (And I Won! :) )

I did not follow a specific design for this quilt - I kind of made it up as I went along. 

In my stash I had a bunch of patriotic charm packs. I'll take this opportunity that to admit that I have a charm pack problem. I have an entire box of them, waiting to be used. Most of them I purchased as daily deals from Missouri Star Quilt Company or Fat Quarter Shop. Needless to say, I've cut myself off (at least until I use some of them).

I found the pattern for the star blocks on pinterest.


https://www.pinterest.com/pin/465630048957792963/

First, I separated all the charm pack blocks and arranged them so there wouldn't be any repeating fabrics within one block and so that they would be evenly distributed throughout (text, stripes, stars, etc). Sorry, my OCD is showing.

I started assembling the blocks and ran into a few issues. Firstly, I had a white solid charm pack that I was going to use for all the star bits, but realized that the method used to make the triangular parts ended up wasting a lot of fabric in the charm packs. I HATE WASTING FABRIC. So I used the charm pack squares for the center square and cut the triangular pieces out of some kona white that I had lying around. 

Problem two - when assembling the squares, they weren't lining up correctly. So, I measured the charm packs (you know, what I should have done first), and found that they were not all the same size. Insert annoyed emoji here. So I went back and trimmed the squares to the 2.5 inches square that they lied about being and finally was able to successfully put the star squares together.


For the stripe squares, I did the same thing - laid out the red squares so there were no repeats within a square, no polka dots or stripes touching, excuse me ma'am, your OCD is showing again...

I cut the red and white squares in half and then sewed them together. I made these blocks a little bigger than I had to because I figured it would be easier to trim them down after I squared the star blocks. 


After these squares were complete (5 blue stars, 4 red and white stripes), I sewed them all together.


Then it was time to figure out how to make this square into a rectangular 60"x80" quilt needed to meet the requirements for Quilts of Valor.

I started by putting a red trim around the whole thing. But...I didn't buy enough red fabric, so I found white fabric with blue stars that I had laying around (good luck for me) and made them into cornerstones so I wouldn't have to go back to the store. Did I mention that I didn't figure out I didn't have enough fabric to go all the way around before I sewed it on? Yeah. I spent some time with Jack-the-seam-ripper on that one.


Finally, it was time to turn this into a rectangle, so I added this AWESOME red, white, and blue fabric to two sides of the square.


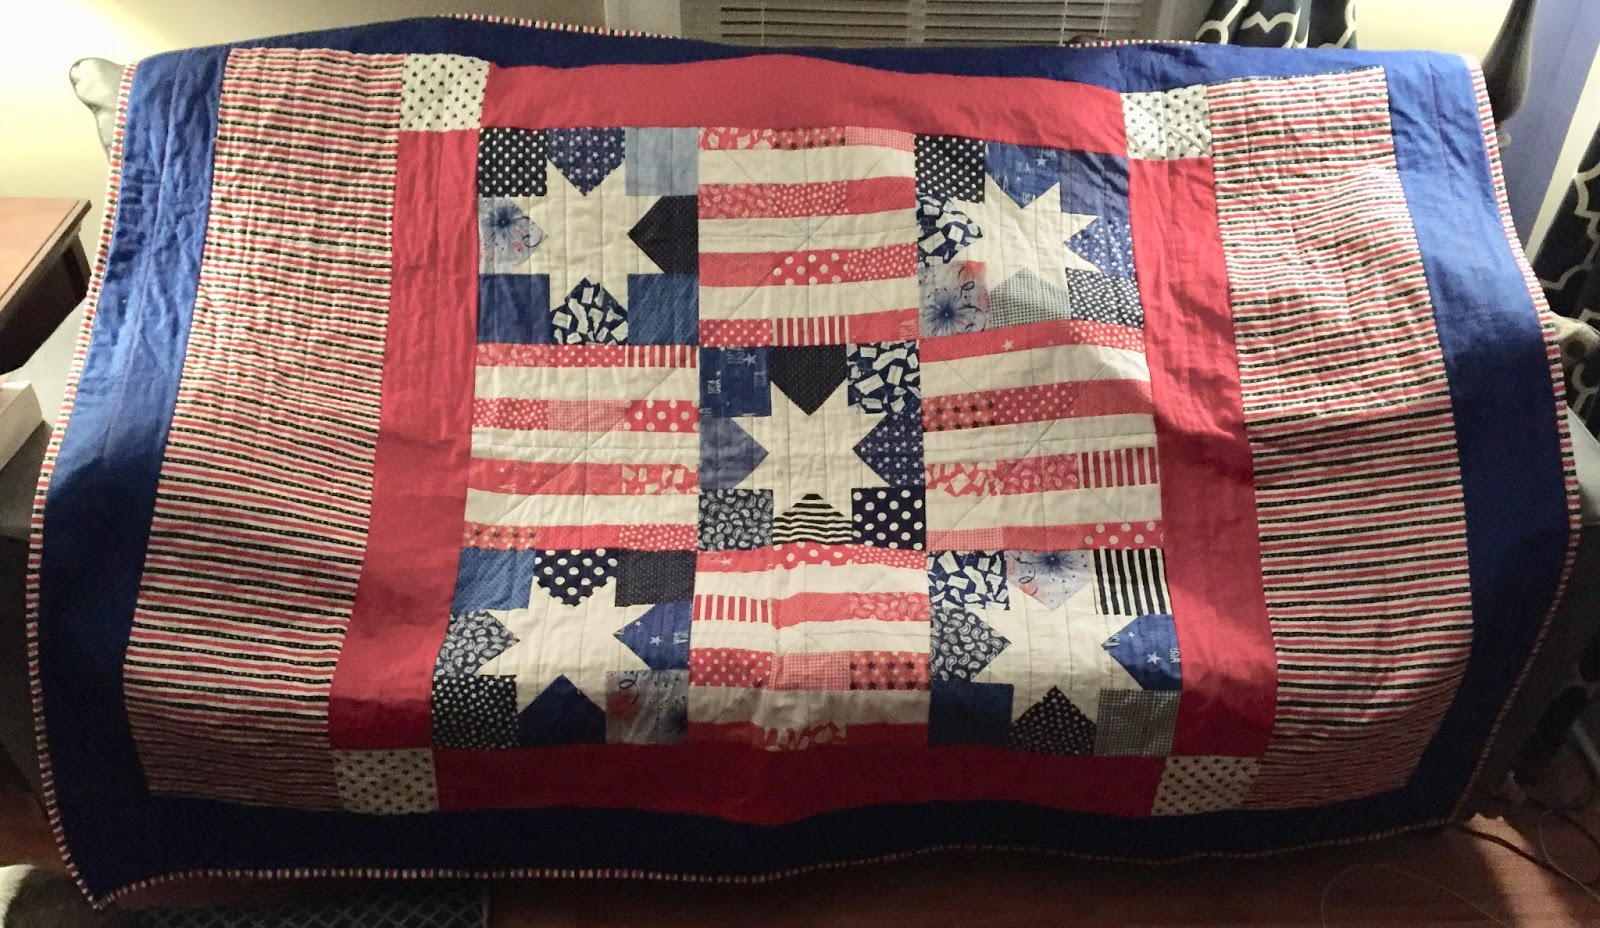
Then, I added a blue border all the way around the rectangle. Here is a picture of the completed quilt top.


For the back, I used this technique that someone told me about in the quilt shop, where you fold the fabric in half longways, sew along the binding side, then cut the fabric up the long side. Poof, instant backing fabric!

I sandwiched the quilt and started quilting. Originally, I wanted to quilt marching blue stars on the red and white squares and red stripes on the blue squares. However, I couldn't get the stars to look right, so I sewed asterisk-style stars on the striped blocks, sewing lines down the centers of the squares in both directions and connecting diagonal corners. I sewed stripes on the blue star squares, as planned.


 Red Quilting on Blue Star Square


Blue Quilting on Red Striped Square

Here are some other quilted elements...nothing fancy, just simple stuff. (I'm not brave enough to try anything really complicated yet...).

 Stripes going the opposite direction of the print.
More stars and stripes

I binded the quilt in the same striped fabric, which contrasted nicely with the blue border.

I'm really happy with how this quilt turned out. I really made it up as I went along and hoped for the best. 

As soon as I make a label for it, I will be sending it off to a veteran in appreciate of their service of the country, hopefully in time for Christmas.
 

Sunday, October 16, 2016

Halloween Candy Corn Quilt


I love Halloween! I've wanted to make a Halloween quilt since I've started quilting, and I still have two more to make...there's always next year. But this year I managed to make my first one! This quilt uses embroidery files I purchased about two years ago from a company named Charming Station Embroidery. This company designs mylar embroidery sets. 

Here's a link to their website:
http://www.charmingstation.com/

Here's a link to this embroidery set:
http://www.charmingstation.com/SpecialSets/Specials17/Specials328.html

On their website, there is a very thorough description of what mylar is, what mylar embroidery is, and how to use mylar in your embroidery projects. Here's my quick explanation. Mylar is a sheet of shimmery plasticy material (similar to vinyl but much less stiff). You can order it in packs from a person linked on their website which allows you to get the type that can go in the washer and dryer. The color that I used and that they recommend is opal iridescent.

Here's how you use the mylar in your embroidery design:

You hoop your material as usual. You tape (or hold) the square of mylar in place as the machine tacks down the outside edge of the design. That's it! Then you go through the rest of the design as usual. When you've completed all the steps, you rip the excess mylar right off the outside of the design. 

The designs that are produced by charming station are not dense, which allows the background fabric and the shimmer of the mylar to shine through the stitching. Personally, I LOVE these designs! 

Here's a closer look:


There are 12 designs total. And the stitchout time is not very long - maybe 15 minutes for the longest one. 

Here's all of them pre-quilt:


Next, I had to decide how I wanted to put them together. I chose to sew two borders around each one, a dark Halloween fabric, and an orange fabric.


Then came the most tedious part. Cut strips the length of the each block to create the sashing between the rows and sew them together so they are all in long rows. Also, remember to make sure the fabric goes in the same direction...let me say that again...make sure you're sewing the sashing fabric on in the same directions (I can't imagine why that would be worth mentioning twice...). Finally I cut long strips to sew in between assembled rows. When this was complete it came out looking like this...


Finally, I pieced a back, sandwiched, and quilted by stitch-in-the-ditch along all of the sashing pieces. My least favorite part, binding time. I chose the orange so it would contrast with the black border, and machine stitched it on, using a blanket stitch on the front.
Still not perfect...but I've gotten much better!
And finally, done. And ready a whole month before Halloween! I still need to make a label for it. I think I'll name it "Trick or Treat," unless I can come up with something more clever. I love this quilt!! It has a seat of distinction on my couch between a Halloween pillow my mom made and a crazy quilt pumpkin I made....until Halloween anyway.

HAPPY HALLOWEEN!

Monday, October 3, 2016

Fall Mug Rugs

I'm a member of the Molly Pitcher's Stitchers guild in my town, and during the course of the year we sign up to bring in door prizes for the monthly meetings. Door prizes can be fabric, sewing tools or accessories, or handmade items. I decided to make fall themed mug rugs for my door prize.

My mother has a Anita Goodesign membership and there is a pretty fall set in the current collection. The design pack is called "Autumn 1, 2, 3." You can check out the collection here: https://www.anitagoodesignonline.com/product/autumn-123/

Anita Goodesign's 1, 2, 3 collections are amazing embroidery tools. You can mix and match borders (some with embroidery on them!), embroidery designs, and stippling or background stitches from a fairly large collection of options.

Here are some close-ups of the designs I chose to use.

I don't like the coloring of the bird's face. If I were to stitch this one again, I'd alter it somewhat to make the features stand out better.

This one is my favorite.
Here's the process:
1. I stitched all the designs on a piece of fabric.
2. I decided how big I wanted the mug rugs to come out. 
When they were completed, they were about 5x7.
3. I cut them all to the same(ish) size.
4. I found a coordinating backing fabric, and cut pieces to match. 
5. I sandwiched it with some batting inside.
6. I made binding, and machine binded it like a quilt. I used a leaf pattern decorative stitch and brown variegated thread to bind the front. 

Things that I didn't do that I should have:
Binding things that are small is difficult and annoying. If I made these again, I would have cut the back pieces of fabric larger than the front and used a wrap around binding method to finish them.

All in all, I'm happy with how these came out and would probably make them again as a quick gift.


Sunday, August 7, 2016

Southern Comfort


I bought the pattern for this pineapple wall hanging about two years ago and it was placed on the back burner of projects to complete. I even had fabric picked out for it and ready to go for several months. I love this pattern, and it even has a home picked out in my orange ombre dining room. This pattern was also deceiving in that it took much longer to complete than expected.

I chose to do this all in batiks, and even the white, which looks solid, is not. I don't like solid fabrics - I think they're boring. There was a lot of precutting, including the very thin strips in between the blue squares and the even smaller cornerstones, where the white lines intersect. 


The first thing I did was lay out the blue squares a million different ways so that there weren't duplicates next to each other or diagonal from each other. I even tried to not have the same ones in the same rows, however that did not work out so well. Once the layout is decided upon, you sew the squares and single strips with cornerstones into rows. 

Here's something that also isn't fun - sewing 1" squares onto the ends of 1" strips. Piecing fabric that small just is not my idea of a good time. The sewing machine just wants to chew on fabric that small. 

After the long strips were completed, I sewed the longer skinny strips to the square strips trying to match up the corners of those teenie tiny cornerstones. And shockingly, they mostly came pretty straight (I've been practicing piecing more accurately).

Next it was the not fun part. The applique. I've decided that I don't like applique, which is awesome since I have two applique projects lined up in the future. For anyone who has not done machine applique, there are two types - raw edge applique (for people who value their sanity) and turned edge applique, which I will probably never ever do. 

To do raw edge applique, you need to trace the reversed pattern pieces onto a piece of Heat-N-Bond or Wonder Under (double sided fusible). Then you iron it to the fabric, then trim each tiny piece, figure out the placement on the large fabric, peel the back, iron it on, and stitch it down. 

There were three issues with the applique on this project. The first is that the pattern pieces called for the wrong numbers of a couple of colors, so as I was working on the layout I found that I had several pieces cut in the wrong fabric. Secondly, there are a bagillion small pieces which are: 1. a pain to cut, 2. a pain to place, and 3. a pain to sew down. Some of the corners and tiny circles were not easy to sew. Thirdly, I must have had defective Heat-n-Bond, because as I was sewing about a third of the pieces fell off (after I worked so hard at laying them out). Saying I was unhappy about this would be putting it mildly, and I ended up taking a glue stick to the rogue pieces.


After appliqueing the pieces that belonged to the pineapple, it was time to do the same to the borders. These were much easier to lay out, as the not-quite-white fabric that I used was see-through enough that I could see the outlines of the pattern when it was placed underneath.

After all the applique was complete, I sewed the many borders on each side, including the green and white striped borders and the appliqued borders at the top and bottom. 

Then I headed to the longarm, where I chose a blue variegated thread and a cherry blossom pattern - the leaves and circular cherries seemed to match the applique well.

   
I decided to do a tabbed hanging method for this piece. I found a nice copper colored curtain rod with a twisted styled end-piece which matches the general style of the hanging. I decided that I needed 5 tabs to make the hanging hang evenly. I cut 10 6" strips of blue fabric, stitched them together down the long sides, turned them right-side out, top stitched them, ironed them in half, and stitched them to the top raw edge of the hanging (under the binding). I sewed the binding (by machine - I detest hand-binding) to the back, with the tabs underneath. Then I folded the tabs up so they wouldn't get stuck when I was sewing the binding to the front.


 I picked another variegated blue thread and a decorative stitch for the binding. 
 

Finally, label time. I named the hanging "Southern Comfort," as pineapples are associated with welcoming and hospitality in the south. I digitized the pineapple leaves on top of the "S" to make the label look more interesting.

Despite the more challenging aspects of this hanging, I'm really happy with how it turned out, and I can't wait to hang it in my dining room!


Pattern - Welcome - by Cherry Blossoms
       http://www.cherryblossomsquilting.com/product/welcome/